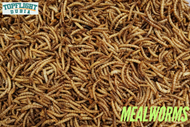
High-Quality Mealworms for Pets & Wildlife - Topflight Dubia
Posted by TopFlight Dubia on Apr 4th 2024
A Comprehensive Guide to Raising and Understanding Mealworms
The larvae of the mealworm beetle (Tenebrio molitor), commonly referred to as mealworms, are incredibly versatile insects. They are widely used as a food source for pets, in composting, and even in some human foods. Whether you're interested in raising these larvae for your reptiles, birds, or as a sustainable protein source, understanding their life cycle, diet, and care is essential. This guide covers everything you need to know, from their biology to practical tips for raising and breeding them.
What Are Mealworm Larvae?
These larvae are the young form of the mealworm beetle, a species of darkling beetle. Yellow mealworms are commonly found in stored grains but are especially valued as feeder insects because of their high protein and fat content. In the wild, they play a crucial role in breaking down organic matter, making them important decomposers.
The Life Cycle of the Mealworm Beetle
Understanding the life cycle of these insects is key to successfully raising and caring for them. Their development includes four main stages: egg, larva, pupa, and adult beetle.
1. Egg Stage
The life of these larvae begins as tiny, white eggs laid by a female beetle in a suitable substrate, such as wheat bran or other grain-based materials. The eggs are incredibly small, less than a millimeter in length, and are usually laid in clusters.
The egg stage lasts about 30 days, depending on environmental conditions like temperature and humidity. Warmer, more humid conditions can speed up the development process.
2. Larval Stage
The larval stage is the longest and most active phase in the life cycle. After hatching from the egg, the larvae emerge as small, yellowish-brown insects that can grow up to an inch long. Their bodies are segmented, and they go through several molts, shedding their exoskeletons as they grow.
During this stage, they consume large amounts of food, mainly grain-based substrates like wheat bran or oats, along with small amounts of fruits and vegetables. Their diet is crucial for proper growth and the development of their protein and fat content.
The length of the larval stage varies but typically lasts from several weeks to a few months. Warmer temperatures can accelerate their growth, while cooler temperatures slow it down.
3. Pupal Stage
Once fully grown, the larvae enter the pupal stage. At this point, they stop eating and curl into a C-shape as they prepare to transform into adult beetles. The pupa is immobile and highly vulnerable, relying on its surroundings for protection.
This stage lasts about 1-3 weeks, during which time the larvae undergo significant changes to become adult beetles. Once the transformation is complete, the beetle emerges, ready to begin the life cycle anew.
4. Adult Beetle Stage
The final stage in the life cycle is the adult beetle phase. These beetles are dark brown or black and measure about half an inch long. Their primary focus during this stage is reproduction. Shortly after emerging, they begin to mate, and the female beetle lays hundreds of eggs in the substrate, continuing the cycle.
Adult beetles live for several months and are relatively low-maintenance. They are not picky about where they lay their eggs, as long as the environment is suitable for the larvae.
Nutritional Value of These Insects
These larvae are highly valued as feeder insects due to their rich protein and fat content. They are commonly used to feed reptiles, birds, and fish, providing essential nutrients that support growth and overall health.
Dried larvae are particularly popular because they have a long shelf life and retain most of their nutritional value. This makes them a convenient option for pet owners who need a reliable food source.
How to Raise These Insects: A Step-by-Step Guide
Raising these larvae is relatively easy and can be done on a small or large scale, depending on your needs. Whether you're raising them as a food source for your pets or for other purposes, here's a step-by-step guide to get you started.
1. Setting Up the Habitat
The first step in raising these insects is to create a suitable habitat. You'll need a container, such as a plastic bin or aquarium, with smooth sides to prevent the larvae from escaping. The container should have a secure lid with ventilation holes to ensure proper airflow.
Fill the container with a substrate like wheat bran, oats, or cornmeal. The substrate should be about 2-3 inches deep, providing enough room for the larvae to burrow and move around.
2. Adding the Larvae
Once the habitat is set up, introduce your batch of larvae into the container. Spread them evenly across the substrate to give them plenty of space to grow.
3. Feeding and Hydration
These insects thrive on a diet of grains like wheat bran and oats, supplemented with small amounts of fresh fruits and vegetables. Carrots, potatoes, and apple slices are good options as they provide the necessary moisture without adding too much water to the substrate.
It's important to avoid overfeeding, as excess food can lead to mold growth. Provide small portions and remove any uneaten food after a few days.
4. Managing Moisture and Temperature
These larvae require specific environmental conditions to thrive. Keep the container at room temperature (70-80°F) and maintain a moderate humidity level. Too much moisture can cause mold, while too little can dry out the larvae.
If the substrate becomes too dry, you can add moisture by placing a damp paper towel or a few slices of fruit in the container. Check regularly and adjust as needed.
5. Encouraging Breeding
To encourage breeding, ensure that the adult beetles have a suitable environment. The same substrate used for the larvae works well for the beetles. After emerging from the pupal stage, they will begin to mate, and the female beetle lays eggs in the substrate.
Maintain stable conditions, including consistent temperature and humidity, to promote successful breeding. Periodically check the substrate for signs of eggs and newly hatched larvae.
6. Harvesting the Larvae
As your colony grows, you can begin harvesting the larvae for use as feeder insects or other purposes. To harvest, sift through the substrate to collect them. You can either use them immediately or store them for later use.
If you're raising them on a larger scale, consider separating the larvae from the beetles to prevent overcrowding and ensure a steady supply of insects.
Common Challenges in Raising These Insects
While raising these larvae is generally straightforward, there are a few common challenges you might encounter:
- Mold Growth: Excess moisture in the substrate can lead to mold, which can harm the larvae. To prevent this, ensure the habitat is well-ventilated and avoid overfeeding.
- Pest Infestations: Colonies can attract pests such as mites and ants. Regular cleaning and maintenance of the habitat can help prevent infestations.
- Overcrowding: Rapid population growth can lead to overcrowding, which stresses the insects and slows their growth. Monitor the colony size and separate larvae from beetles as needed.
The Benefits of Raising These Insects
Raising these insects offers several benefits, especially for pet owners. Here are a few reasons why they are a great choice:
- High Nutritional Value: They are rich in protein and fat, making them an excellent food source for reptiles, birds, and other animals. They provide essential nutrients that support growth and overall health.
- Cost-Effective: Raising your own colony can be more cost-effective than purchasing them from a store. Once established, a colony can provide a steady supply of feeder insects.
- Low Maintenance: These insects are easy to care for and require minimal maintenance. With the right setup, you can raise them with just a few minutes of care each day.
- Sustainable Food Source: They are a sustainable option for feeding pets. They reproduce quickly and can be raised on household food scraps, reducing waste.
Conclusion
These larvae are versatile and valuable insects that can be used for a variety of purposes, from feeding pets to composting. Understanding their life cycle, dietary needs, and care requirements is essential for raising healthy larvae and ensuring a successful colony.
Whether you're just starting out with raising these insects or looking to improve your existing colony, following the tips and guidelines outlined in this guide will help you achieve the best results. By providing the right environment, diet, and care, you can enjoy the benefits of a thriving colony for years to come.
Feed Your Reptiles and Birds High-Quality Feeder Insects from Topflight Dubia
Knowing how to raise mealworms is a great way to keep healthy food on hand for your pets. But for an equally effective option, TopFlight Dubia sells the best and most nutritious feeder dubia roaches you can find. Order now!